grip strength
Wrist Strength Exercises: Levering, Sledge Hammer, Curl & Roller
Levering
Levering is the use of either a sledge hammer or a wrist leverage bar to train the wrists. It also places significant stress on the supporting grip of the hand. Levering is done to the front, rear, side, and overhead. Because of the high torque that is created by even a light weight, it is important to minimize injury risk by performing the exercises slowly, with strict attention to form. When comparing feats of levering strength with others, it is assumed a 32” sledge is being held at the end of the handle. Many attribute wrist strength developed via levering to be responsible for their success at bending short steel.
Overhead Lever
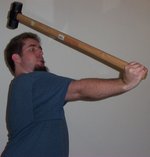
The arm stays parallel as the hammer breaks the plane of the head.
The overhead lever is used to train ulnar deviation of the wrist. Stand with the arm straight out to the side of the body, hand at head height. Hold the sledge hammer in the outstretched hand with the handle pointing straight up. Keeping the arm straight and hand high, slowly lower the hammer head until it breaks the plane of the head, then return it to vertical. Be prepared to catch the hammer with the other hand should the attempt fail. A 10lb overhead lever is a respectable lift. Some extremely strong men have performed this exercise with hammers in excess of 20 pounds.
Rear Lever
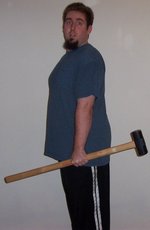
The hammer handle should reach well past parallel with the floor.
The rear lever is used to train ulnar deviation of the wrist. Stand with the feet parallel to one another. Place a sledge hammer to one side, with the hammer head on the ground parallel to the feet, and handle pointing straight up. Holding the arm straight, against the side of the body, grasp the end of the hammer handle. Moving only the wrist (be sure to keep the arm straight), bring the head of the hammer up behind the body until the handle is past parallel to the ground. Slowly lower it. Rear levering a 32″ long, 8lb sledge is a worthy starting goal.
Front Lever
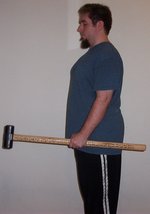
Some arm flexion may be needed to break parallel.
The front lever is used to train radial deviation of the wrist, and is one of the most difficult levering exercises. Stand with the feet parallel to one another. Place a sledge hammer to one side, with the hammer head on the ground parallel to the feet, and handle pointing straight up. Holding the arm straight, against the side of the body, grasp the end of the hammer handle. Moving only the wrist (be sure to keep the arm straight), bring the head of the hammer up in front of the body until the handle is parallel to the ground. Slowly lower it. Front levering a 32″ long, 6lb sledge is a worthy starting goal.
Side Lever

Training wrist supination
The side lever is used to train pronation and supination of the hand. Stand with the arm against the side, elbow bent at a 90 degree angle. With the wrist neutral, hold a sledge hammer by the handle so the head is straight up in the air. To work pronation, slowly rotate the forearm until the palm faces dawn and the hammer handle is parallel to the ground, then return the hammer vertical. Supination is trained by rotating the other direction, so the palm faces up at the mid point of the exercise.
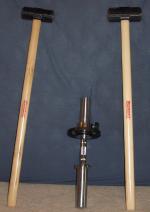
Sledge Hammers
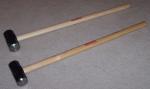
6lb and 8lb sledges.
Sledge hammers are one of the primary tools used for levering. They can usually be purchased with head weights of 6, 8, 10, 12, 16, or 20 pounds. An 8lb hammer is a good starting place for someone new to levering. Found in the garden section of the hardware store, expect to pay around $20 for a 36″ hammer with a wood handle. You may also consider buying just the wood handle and fastening plates to it in order to make an adjustable hammer. It is common to train up to a heavy hammer by choking up on the handle to make exercises easier. Mark the handle at 1″ increments to allow for accurate records of progress.
Wrist Leverage Bar
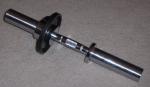
Wrist leverage bar with a 2″ diameter handle, made from an olympic dumbell.
A wrist leverage bar is a tool for training levering exercises, consisting of a short bar that is plate loaded at one end. This allows the lifter to progressively increment training weights. Some leverage bars have fat handles that are designed to train the supporting grip at the same time as the wrists.
A homemade wrist leverage bar can easily be created by adding weights to one end of a plate loaded dumbell and holding it from the other end. Use an olympic dumbell if a thick handle is desired.
Though plate loaded leverage bars are marketed as a state of the art wrist training tool, many find work with a real sledge hammer to be more motivating.
Plate Curl

Resist the tempation to swing the weight up.
The plate curl works the wrist, individual fingers, and thumb. To perform this exercise, stand a plate up on its edge. Grasp the plate over the top, with the finger tips spread on the flat back of the plate (not in the hole) and the thumb hooked over the rim of the plate. Position the body as if setting up for a bicep curl. While keeping the wrist straight, curl the plate to the shoulder and back down. Avoid swinging the weight as this will remove much of the stress from the hands and wrists.
The jump in difficulty between plate sizes is very large, so progression in the plate curl is typically achieved by affixing additional small weights to the plate until the wrist gets strong enough to move up to the next level. A couple of pony clamps or c clamps work well for this. Moving the added weight further out on the edge of the plate will make the exercise harder.
Due to the stress placed on the wrists, it makes sense to gradually work up the weight on this exercise. Starting with a 10lb plate, make the first target 2 10lb plates clamped together. Try to progress to a 25lb plate for reps. Plate curling a 35lb plate is attainable, but will prove to be a very challenging goal for most.
Plate Wrist Curl

Plate wrist curls done in this style will not be strict. Use a bench instead
The plate wrist curl places a similar stress on the fingers, wrist, and thumb as the plate curl, but with the added benefit of providing dynamic resistance for the wrist. To perform this exercise, stand a plate up on its edge. Grasp the plate over the top, with the finger tips spread on the flat back of the plate (not in the hole) and the thumb hooked over the rim of the plate. Sit on a bench and rest the forearm on the thigh, with the palm facing up, plate parallel to the ground. Slowly relax the wrist, letting the hand drop to an inch or two below parallel, then flex the weight up until the plate is almost perpendicular to the ground. Lower the weight in a controlled fashion.
Progression for the plate wrist curl is achieved using clamps to affix additional weights to the plate, similar as to in the plate curl. The big difference here is that due to the dynamic motion of the wrist, weights that are manageable on the plate curl will prove to be quite a challenge on the plate wrist curl.
Wrist Roller
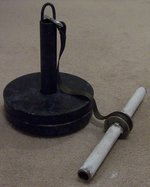
Well chalked 1 3/8″ wrist roller with loading pin.
One of the most basic tools for strengthening the forearms, the wrist roller is a straight bar with a cable attached in the middle. Weight is hung from the cable via a loading pin, and as the name implies, the implement is rotated with the hands to bring the weight up. For developing serious grip strength, the wrist roller is normally used supported on a barbell or the safety pin of a power rack at shoulder height.
Key factors to consider when selecting a wrist roller are the diameter, length, knurling, and how smoothly it will roll:
- Diameter – Wrist roller diameters tend to range from 1 3/8″ up to 3″. The larger the diameter of the roller, the more the stress of the exercise is shifted from the wrists to the hands, especially the thumb. A roller that barely allows the thumb and fingers to touch when the hand is wrapped around it will provide the most even balance between stress on the hands and stress on the wrists.
- Length – When choosing a wrist roller, be sure it is long enough to comfortably place both hands when the arms are held straight out from the body. For most people, the appropriate length will range from 18-24 inches.
- Knurling – Wrist rollers are available with a range of knurling, from very sharp to none at all. Sharp knurling is not desirable on a wrist roller. When the weights get hard, knurling will cut into the skin on the hands, limiting training frequency and poundages used. A smooth finish on the wrist roller will provide sufficient friction for training the exercise while preserving the skin on the hands. If slightly more grip is needed, athletic tape can be wrapped around the roller.
- Rolling Smoothness – Many wrist rollers are constructed by taking a piece of pipe, drilling a hole through the center, and then running a cord through the hole, knotting it inside the pipe to hold it in place. This method of construction will create a bump in the exercise, when the knot is rolled over on the supporting pin. The bump can be minimized by either welding washers on to the end of the roller with openings smaller than the inner diameter of the pipe or by sliding a piece of PVC pipe inside the roller to sit between the knot and the supporting bar. Training on a roller with a bump will not diminish the effectiveness of the exercise but can be annoying.